Monday 31 December 2012

Goodbye 2012...Hello 2013!

Hi everyone, it's Sam Hauzer here on the last day of 2012! Can you believe how quickly this year has gone? Tomorrow will bring a brand new year, and what better way to welcome it in than with a cute handmade calendar!


Products used - Pink Paislee Portfolio papers - (the Portfolio 6x6 Paper Pad would be perfect for this!!), Portfolio Ephemera, Artisan Resistable Chipboard Arrows, We R Memory Keepers Bakers Twine Yellow, Colour Shine Spritz Tropicana Teal, Cardboard, Ink.


This little calendar is super easy and fun to make. All you need to do is grab some cardboard from a box, and cut it to the size you want. I cut mine to around 14cm x 10cm. Then just peel off some of the top layer of the cardboard to reveal the corrugated card underneath.


Then just grab a Spritz spray in a coordinating colour to the papers you plan on using, and give the cardboard a bit of a spray and splatter, especially around the edges where you will see it.

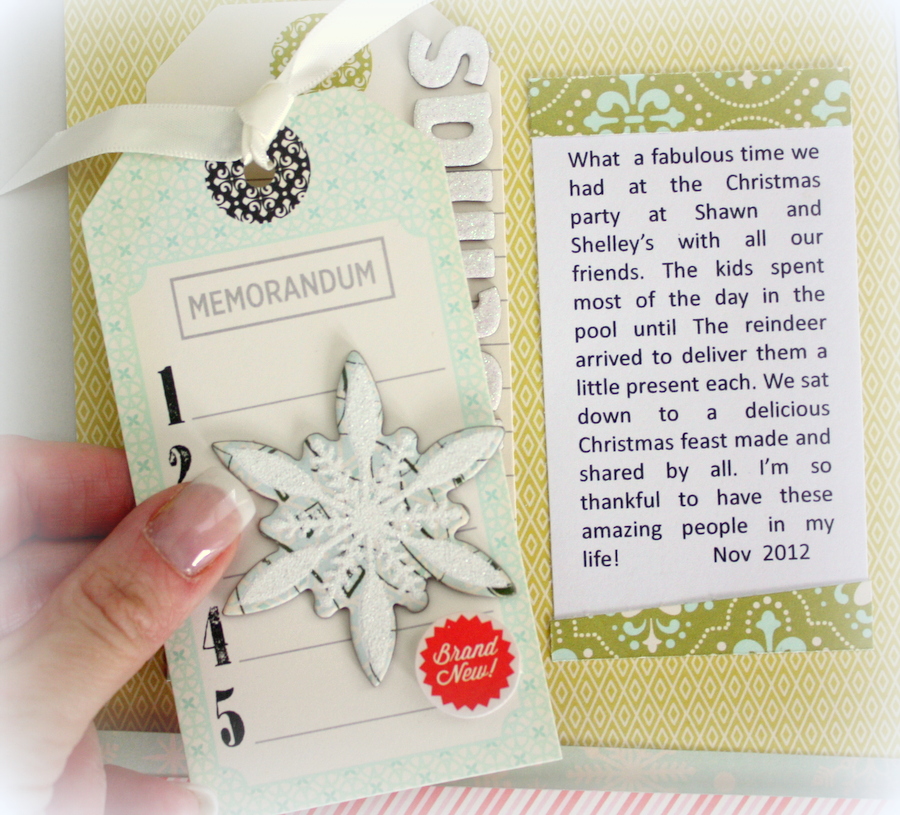
Then all you need to do is cut up some calendar months (there are plenty of free calendar print outs available on the net), small pieces of paper, die cuts, and a few favouite photos, and layer them together on your cardboard pieces. Pierce two holes at the top and bottom of each piece of cardboard (except for the bottom one), then use twine to connect them all together. The top one will be a bit longer, so you can hang it up. Decorate the front 6 pieces with January through to June, then turn the whole thing around and do July to December, then you've got a cute, personalised calendar to start the new year!


The Pink Paislee Portfolio range is perfect for a project like this, because the colours are suitable to use for just about anything. You can grab yours in the Sassy Scrappers Shop HERE.

I hope you all enjoy the last day of 2012, and have a FABULOUS New Year!!

Sunday 16 December 2012

Pink Paislee - Portfolio

Hi there! It's Sam Hauzer here, with a layout I've done using the GORGEOUS Pink Paislee Portfolio range. The colours are really quite neutral, and can be used to create layouts about just about anything...


Products used - Artisan Words Family, Artisan Resistable Chipboard Arrows , Portfolio Remarkable, Portfolio Unbelievable, Portfolio Ephemera, We R Memory Keepers Bakers Twine Yellow, Colour Shine Spritz Tropicana Teal 2oz   Twine,Orange Rhinestones, ink, black pen.  


The Artisian words are really fun to use! I just gave the word 'fun' a quick spray with the Tropicana Teal spritz to give it a bit of colour to match in with my layout. The tags from the Portfolio Ephemera are the perfect place to pop a short title and a bit of journalling.


I've outlined some of the printed words, to make them really stand out!


I only used 2 patterned papers on this layout - one for the base of the page, and the other one I just cut up and layered behind the photo.


I used the Tropicana Teal spritz to add a bit more colour to the background, and it adds a really nice shimmer to the page as well!

How gorgeous are these patterned papers?!!

Die cut shapes are always so easy to use to finish off a layout, and these ones have the most perfect words on them...


Make sure you check out the Sassy Scrappers shop HERE to check out the whole range of Pink Paislee Portfolio. You'll love it!!

Friday 14 December 2012

Kim Jeffress -Guest Designer part 2

Hi everyone
I am back again with my final shares as Guest Designer for Sassy Scrappers this month. I got to play with Pink Paislee City Sidewalks collection.
I made another layout this time using iphone photos from our trip to visit Santa recently!
I layered Candy Shoppe pattern  paper over Storytime pp then added a piece of vellum over the top just to soften it a bit. I then created a blocked design using my photos and pices from the Ephemera and Parcel Tags set.


I added some white glitter to the mini peg found in store to add a bit of glitz to my page.


Do you spy the grey City Sidewalks and Special Delivery banners on my layout? They are cut from the manufacturor labels that you cut off from pattern paper- perfect embellishments to complete my project.

For my Card I started with a base of Park Place pattern paper then added the tag from the Parcel Tags set, threading through some bakers twine to finish it of. I then added some pop dots to the Santa from the Ephemera pack. I added some white glitter to the wooden Merry Christmas title from KaiserCraft to finish my quick and simple card.

 
 Thanks so much for letting me play along this month!

Kim Jeffress

Thursday 13 December 2012

Secret Admirer


Hello there

Natalie here today!

Just a quick drop in with a double page I created using the 
new GORGEOUS Secret Admirer range from Kaiser!
You can find it HERE!
Flowers from Green Tara and Prima were perfect for
 this page along with some dies from Spellbinders and punches by Martha!


Hope all your Christmas preparations are going well!

Monday 10 December 2012

Secret Admirer Inspiration from Sam Hauzer..

Hi Everyone,
Its Olga here tonight to share, whilst Sam is having a well deserved break....

I just wanted to share this gorgeous layout Sam has created using the Kaisercraft -Secret Admirer Collection..I must tell you the colours in this paper are my absolute favorites. A mix of Pinks and Greens...
 
Materials List: Flourish Birdcage Large, Love and Cherish Flourish, Kaisercraft Blooms in Olive and Fuschia and Coconut and the Kaisercraft Secret Admirer Collection Papers ..
 
To see more of this collection, pop over to the store HERE..
 
Thankyou for stopping by ..
Olga..xxx


Sunday 9 December 2012

Guest Designer - Kim Jeffress


Hi everyone it's Kim Jeffress here and I'm honoured to be Guest Designing for Sassy Scrappers this month.
I am a SAHM to two little boys aged 4 and 6, they are my main scrapping inspiration so you wont see many flowers or bling on my layouts LOL! I have been scrapping for about 10 years now and in the last couple of years decided to take it a little further and start designing for manufacturors. Currently I am on the design teams for Basic Grey, Bella Blvd, Pebbles Inc. This year I have been honoured to be a Scrapbooking Memories magazine Master- What a fabulous year I have had. However by far the most exciting opportunity for me is being apart of the first ever Heidi Swapp media team, what an amazing experience it has been.
My preference is creating single multi photo 12 x 12 layouts with meaningful journaling. After all that is what scrapbooking is about preserving my family's memories for the future. You will see me chasing my boys around, iphone in hand catching on camera the little day to day things that are so important.... Being on the DT for Heidi Swapp I have also grown to love using her Memory File system, what a fabulous way to capture memories and include lots of photos at the same time!

I was sent the fabulous City Sidewalks collection from Pink Paislee and today I want to share a layout and a card I created.
I started with a sheet of City Shoppers pattern paper as my base. I then added strips of Candy Shop and Special Delivery at the top and bottom.


I gathered pieces from the Ephemera pack to scatter above my title and journalling block.


Here I have used a tag from the Parcel Tags set on the edge of my layout.


You may ask where my journalling is?  I typed out my journaling and adhered it to my base page. I then glued a small magnet on the back of the layout and on the underside of the Memorandum tag, I can now lift the tag right off the layout to read my journaling.


For my card I cut a piece of Park Place pattern paper and machine stitched it to the card. I then used another tag from the Parcel Tags set , threaded through some twine and attached it to the front of my card. I added a ticket stub from the Ephemera pack and a a glitter chipboard snowflake. I then added some soft white ribbon to finish it off ! The Delight Glitter Thickers are from American Craft.


Thanks for looking, Ill be back next week with some more projects using this fun collection.

Remember, all materials for these projects can be purchased from Sassy Scrappers...HERE

Thursday 6 December 2012

Would you like to be our Guest Designer ? Then join the December Challenge.....

Hi Scrappy Friends,

Olga here today to remind you about our December Challenge...No sketch this month, just send in your best work to us.. We will chose the best entry to be our February Guest Designer...You will receive a generous design kit in January with lots of goodies, to the value of $50.00 (approx)...
So please get those entries in..You can email them to us at : sassyscrapper@wideband.net.au or alternatively use the linkz tool on the BLOG..

Also, dont miss our FREE postage offer on all our Stamps and Stamp Sets, this offer will continue to Sunday the 9th of December...So get in quick...


Glitz French Kiss Stamps
 
 
Have a great evening
Olga..xxx


Tuesday 4 December 2012

November Sketch Winners and December Challenge

Hello Everyone, I hope your week has started off well...

Today we are announcing the winners of our November Sketch Challenge and these are the magnificent entries...
Anita Enright
 
 
Ann Murphy
 
 
Kim Kendall
 
And the winner is (drum roll......)
 
All three girls are winners...Thats right, it was just too hard to choose , so being its almost Christmas, we have decided to give each of these girls a $20.00 Sassy Voucher..Congratulations girls and thankyou so much for participating in our November Sketch Challenge...xxx

Now, for our December Challenge we are asking you to send through your favorite layout/project/card and one lucky lady will be chosen as our guest designer for February next year...They will receive a DT Kit in January valued at $50.00 (approx) and get to play with us for the whole month...So get those entries in...
 
Have a wonderful day ...
Olga..xxx


Monday 3 December 2012

Kaisercraft 'Pickled Pear' Layout

Hi everyone! Sam Hauzer here to share a layout I've created using the gorgeous Kaisercraft Pickled Pear collection...

“Love Always Forever” Layout


The Pickled Pear collection has to be one of my favourite Kaisercraft ranges to date! The colours are absolutely gorgeous, and the papers are perfect for layering. I love the ‘Thyme’ paper which I’ve used for the base of my page, because it already looks like I’ve been busy layering papers.

And here's a card I've created with this same range...


This collection is really quite neutral, so it’s easy to make cards for any occasion!


You can see the fantastic range of Kaisercraft Pickled Pear in the Sassy Scrappers shop HERE.

Hope you have a great week!

Thursday 29 November 2012

More from Yours Truly ....


A little tutorial today on how to customize those
super cute Pink Paislee Artisan embellishments!


I used this gorgeous set and simply altered it to suit my page.
Larger Image 

After putting my page together, I{using the Yours Truly line from Glitz} realized I
didn't have the right colour title. The Artisan Words hold colour perfectly!

I cut out the desired word first, leaving it on it's backing.

Using a paint brush, I chose a spray mist (I used a really dark blue from Maya Road)
and painted the lettering.
 

I gave it a generous coat, then using some paper towel, dabbed off the excess.
I did this a couple of times to get the right shade of blue I was after and then set it aside to dry.

 
Peel it off the backing and stick to your page! Simple as that!

This photo is of my super talented and sweets friend Nic Howard and myself take at the Spring Escape Retreat in New Zealand in October - awesome creative chick!


 I'm pretty pleased with the results!


Other items I have used:

Prima Flowers: Serenade Blue
Bo Bunny Flowers: Wildberry Zinnia

So that's it from me today!
Be good and stay safe
xxxxx

Wednesday 28 November 2012

The Sweetest Thing - Layout Tutorial by Samantha Hauzer

Hi Everyone,
Olga here tonight with a fabulous Tutorial by the talented Sam Hauzer..I love Sam's mix of colours and I absolutely love the detail in her layout, so I couldnt help but share her wonderful work....We have been lucky to have Sam create some instructions on how to recreate her layout...Enjoy...


Sweet Thing – Layout Instructions


Product List:
All products are available from our Store HERE or click on the link..www.sassyscrapper.com.au

  • The Sweetest Thing Tangerine Happy Sunny
  • The Sweetest Thing Tangerine Together Round
  • The Sweetest Thing Tangerine Hello Greetings
  • The Sweetest Thing Tangerine Wonderful Delighful
  • The Sweetest Thing Tangerine Happy Layered Stickers
  •  Imaginarium Words Love Cherish and Adore. #IDW0026
  • The Sweetest Thing Tangerine Hello Buttons
  • American Craft Thickers, Niki Riki: 53041
  • Prima Flowers Aria D: 561994
  • Prima Flowers: Charlotte Melon: 557300
  • Yellow Twine by the metre
  • Black Pen
  • Other - Resin Products

 Instructions:

1.     Start with a base of The Sweetest Thing Tangerine Happy Sunny, and doodle around the border with a black pen.

2.     Cut a circle with a 20cm diameter from The Sweetest Thing Tangerine Together Round paper, making sure you cut as close to the edge of the paper as possible, so you are still able to use the remaining paper. Draw around the circle with black pen and put aside.

3.     From the remaining The Sweetest Thing Tangerine Together Round paper, cut 4 strips which are approx 2.5cm wide. Fold them roughly, concertina style, then attach them around the circle, applying strong glue or double sided tape to the underneath of the circle to keep them in place.

4.     Attach the circle to the centre of your page.

5.     Using a black pen, draw a border around a 5x7 photo, and place on the left side of the circle on your page.

6.     Place a sticker from the The Sweetest Thing Tangerine Happy Layered Stickers slightly overlapping the top right of the photo.

7.     Cut some words from the The Sweetest Thing Tangerine Hello Greetings paper, outline with black pen, then place them on the right side of the circle, underneath the Layered Sticker. Add some journaling.

8.     Cut some flowers from the The Sweetest Thing Tangerine Wonderful Delightful paper, and overlap them around the photo as shown.

9.     Paint the #IDW0026 Imaginarium Words Love Cherish and Adore words and arrange them around the photo.

10.   Add a title around the circle on the page using Thickers or other alphabet stickers.

11.     Embellish your layout using The Sweetest Thing Tangerine Hello Buttons, flowers, resin, twine and anything else you like!


Happy Scrapping
Olga..xxx
www.sassyscrapper.com.au


09 10